Last month, we looked at the differences between serial and parallel processing and applications for each. We examined the idea that, generally, serial processing is applied in situations where you want 100 percent of a signal to be processed, while parallel processing is applied in situations where you want to add an effect into the mix along with the original signal. We also examined why we typically use serial processing for dynamic effects but use parallel processing for time-based effects such as reverb and delay. Now let's take a closer look at compression in particular, and twist some of the rules.
The most popular use of compression is to control the dynamic range of a signal, reducing it so that an instrument or voice "sits" in (or in front of) a mix. Some vocalists or instrumentalists may produce certain notes that are stronger or weaker than others, and compression can smooth out the peaks and valleys in volume. Care must be taken not to over-compress a sound, creating undesirable side effects. These might include situations where: 1) the level of the sound is reduced too much, burying it in the mix, 2) the life and personality is removed from the performance; 3) the process of compression audibly changes the timbre of the sound in an unflattering way (i.e., fast attack times can dull a sound, and extreme compression combined with quick release times can produce distortion).
What if we bent the rules a bit and treated compression the way we treat reverb or delay, as an effect added to the mix along with the original signal? This would give us the ability to create different personalities from the same signal.
Diagram 1 shows routing that might be familiar from last month's "Theory and Practice" column: The aux send output from a mixing console is routed to an external processor. Last month, the processor was a reverb; this time, the reverb is swapped out for a compressor. The red line shows audio from the kick, snare, hat and tom routed directly to the L/R Mix Bus. The green line show the path of the aux send from these channels to the input of the compressor, and back into the L/R Master Bus. The compressed drums are added to the mix alongside the unprocessed channels, giving us the option of compressing the drums as aggressively as we want while retaining the uncompressed sound.
Let's take this up a notch by returning the compressor to a spare channel instead of an effect return. The spare channel provides something that many effect returns do not (especially when dealing with analog desks): EQ. When applying a lot of compression, a sound can become dull or thinned out in the bottom end, and EQ can help compensate. Furthermore, we can use the EQ to hype the compressed sound. Boosting the region around 100 Hz (8 to 10 dB) and again in the top end around 8 to 10 kHz (same amount) restores the sparkle lost due to compression and can add "girth" to the bottom end.
The audible result is far different from simply compressing and EQing the drum channels. This technique is often referred to as the New York Compression Trick (NYCT), a phrase which I believe was coined by producer/engineer Bobby Owsinski. The idea is to hit the compressor hard to achieve between 10 and 20 dB of gain reduction, with a high ratio and a fast attack. You'll have to experiment with the release time based on the tempo of the material, but keep in mind that some compressors will produce distortion when the release time is very short. (This is not necessarily a bad thing, since we are creating an effect). Once you have the compression effect to your liking, add it into the mix just under the level of the uncompressed drums, which makes the kit sound bigger and more consistent in level, without squashing the life out of it.
Devil in the Details

Diagram 2 shows one way to route this in the analog world using an outboard compressor. This routing may also be used with a digital desk (more on that in a moment). Another way would be by patching the compressor on the insert of an audio subgroup, assigning the drum channels to that subgroup, and then assigning the subgroup to the L/R mix bus. (However, keep in mind that most audio subs don't have EQ).
In the digital world, there are million ways to do this. First, what I call the ghetto method: On the rear panel of the mixer, connect the output of an unused Aux Send (two for stereo) directly to the input of a spare channel. Crank up the level of that particular aux send (unity gain is a good spot) for every drum channel. You'll now have a submix of the drums on the spare input channel. EQ the channel as mentioned above. Turn the compressor on, and start with the following settings: threshold at -20, ratio at 10:1, attack at 5 mS, release at 150 mS. Mix this in to taste, but you're not quite done…
A concern not-so-obvious to the eyes, but very obvious to the ears, will be that of DSP delay. It is quite possible (perhaps even likely) that the compression channel will be "late" getting to the mix bus relative to the original channels due to two reasons: 1) the Aux Send is physically leaving and returning back into the console, so it is subject to D/A/D conversion; and, 2) there is "extra" DSP on the compression channel. Remember that A/D and D/A conversion, as well as DSP, takes time, however small, and that small time difference can create (at best) flanging or (at worst) flamming. The solution will be to slightly delay each drum channel, perhaps by a millisecond or two. This will hold back the original drum channels long enough for the compressed channel to "catch up." Delay settings will definitely require experimentation. because DSP timing varies from console to console, and will even vary in the same console, depending upon sample rate.
A slightly more elegant way of doing this involves internally bussing the Aux directly to the L/R Master. Take, as an example, the Yamaha M7CL, which has 16 "Mix" (Aux) Outs. Typically, you'd use them for sends to the internal effects or to external stage monitors, or to create a "Fixed Mix" or Sub Group. In M7CL's mixer Setup page, Mix Outs can be set as Variable or Fixed (in pairs) and can be assigned directly to the L/R Master bus, so once you pick a Mix Out for the compression effect, you simply assign it to the L/R Master.

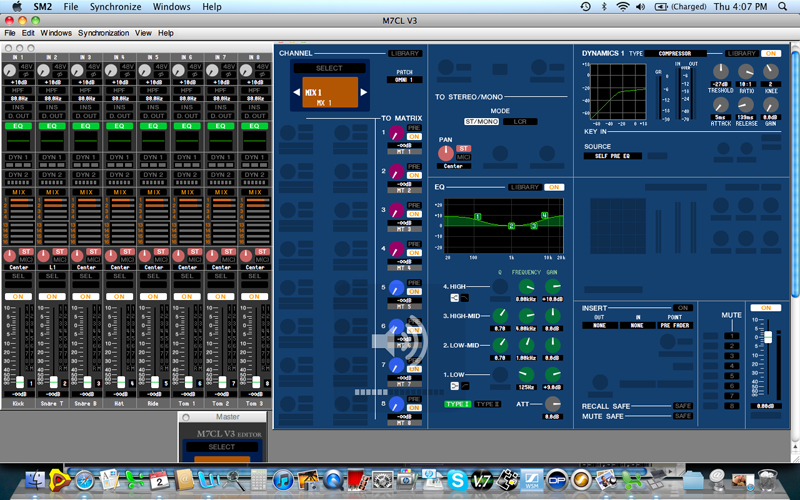
Screen Shot 1 shows Yamaha Studio Manager for the M7CL, where you can see the drum channels are routed to Mix 1 (the horizontal orange strip in each channel. The empty orange rectangle next to Mix 2 indicates that Mix 2 is a Fixed Mix, but the channels are not assigned to Mix 2). The large window with the blue background shows settings for Mix 1, which has been assigned to the Stereo Master with EQ and compression applied.
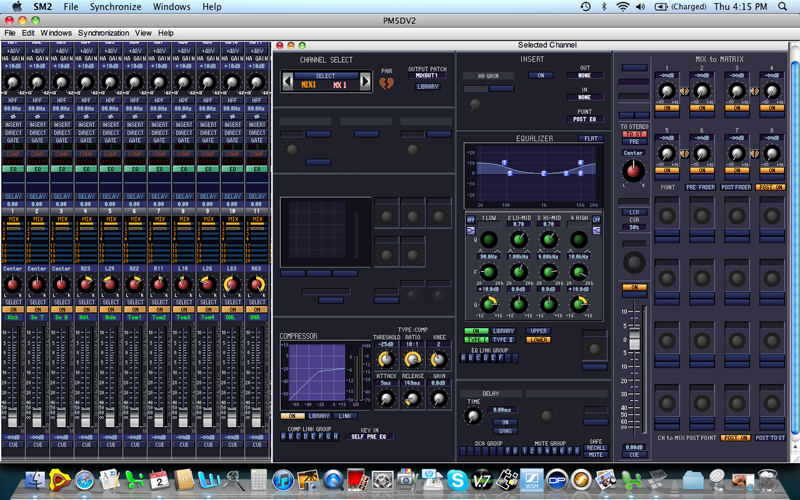
{mosimage}Screen Shot 2 shows Yamaha's Studio Manager software for the PM5D. Again, we have designated Mix 1 as "Fixed" for our compression bus, and assigned it to the Stereo Bus. The Selected Channel Window (right half) shows parameter settings for the Comp channel. Note the compression settings, lower left: threshold at -25, ratio at 10:1, attack at 5 mS and release at 149 mS, and the EQ settings in the middle window (+10 dB at 90 Hz, +10 dB at 10 kHz). Remember that you'll have to play around with the threshold and release settings, but that's where the fun starts.


