How small can we shrink OpenStack?
In this DIY test-bed project we aim to help you setup and run a pre-installed version the OpenStack cloud computing platform from within a live distribution of the Linux operating system.
It's intended to help you get your hands on OpenStack with the least amount of effort or fuss. It's not set-up for production deployments of scale - this is simply the quickest, lightest route to getting familiar with OpenStack.
Our OpenStack test-lab runs on a live distribution. This means that it runs entirely in RAM - so you'd best set yourself up with 30 - 60 minutes of free time, with these instructions open on a separate device to your test unit (a tablet works best).
Our test-bed uses the VirtualBox desktop hypervisor, but can also run on VMware player or QEMU, if that's your preference. You can also run this under a server hypervisor such as VMware vSphere, XenServer or Hyper-V if you have access to one.
You will be configuring a Virtual Machine to host the live distro, but it will not have a hard drive configured, so it will be as close to zero-touch as possible.
Following these instructions, you should be able to go from zero to hero with OpenStack in under an hour. We'll be asking you to:
- Download and install the VirtualBox hypervisor
- Download the pre-built OpenStack live distribution ISO
- Create a Virtual Machine under VirtualBox to host OpenStack
- Mount the live distribution ISO image
- Boot the VM and spin up OpenStack
- Run the OpenStack cloud computing platform
- Login to OpenStack with a web browser
- Create a cloud server instance
- Connect to the cloud server instance
What you will need
To build our OpenStack test-bed you will need the following:
A computer of some form, either a desktop or laptop will suffice, that is running 64-bit x86 compatible hardware.
Please note that this test-bed will NOT run on older 32 bit systems.
Your machine can either be a recent Intel or AMD processor based system, that is:
- Intel Windows PC
- Intel Mac, or
- Intel Linux
Your system will need at least:
- 4GB of RAM
-
2 GB of free Hard Drive space to accommodate for:
- VirtualBox download and install (100 MB download, 500 MB installed)
- OpenStack live distro ISO download (600 MB download and local file)
Once you have built and powered up the entire test-bed, you will have the following complex ecosystem running in your machine:
- Cirros cloud server instance of Linux (running under OpenStack)
- Linux terminal command window
- Chrome web browser running within the Linux host VM
- X11 Windows graphical user interface (within the Linux host virtual machine)
- The OpenStack cloud computer platform
- Linux host VM - VirtualBox hypervisor
- Your native operating system
Please note that if you proceed, you will be running a cloud computing platform on a virtual computer under a hardware hypervisor. You should consider the performance impact it would have on other tasks you are running. Best dedicate your resources to the test-bed and pull it down when you're done.
Let's get started.
STEP ONE: Downloads
The first thing we need you to do is download the following key components: Virtualbox and OpenStack.
Virtualbox
This is the desktop hypervisor platform we will be running the test bed on. Download the relevant version of VirtualBox for your operating system:
OpenStack live distribution
Download our OpenStack live distribution ISO from the following URL:
http://bit.ly/openstack-testbed
http://bit.ly/openstack-testbed
Clicking on the above URL will start the download of a 600MB file called "openstac-test-bed.iso".
Note - Make sure you save the ISO file somewhere you can find it easily. You will need to be able to locate this file once you have downloaded it to your local drive on your personal computer to "mount" it under VirtualBox to be able to boot from it with the host virtual machine we will be creating.
STEP TWO: Install the Virtualbox hypervisor
The installation of Virtualbox is very simple, just locate the installer you downloaded and open it (i.e. double click on it).
Windows users can simply double click the download and it will lead you from there. Linux and Mac OS X users can open the downloaded disk image or TAR file, and run the installer from within.
Follow the prompts and accept the default settings - we will make a few simple changes once the install is completed. In just a few minutes you will have a full working version of the Virtualbox hypervisor installed and ready to use.
STEP THREE: Create a host virtual machine under VirtualBox
Once you have VirtualBox installed, you will need to create a new virtual machine. You can do this either from within the "Machine" menu ( click on "New" ) or by simply clicking on the "New" button in the VirtualBox console.
Create the new virtual machine with the following settings:
Name: openstack test-bedType: LinuxVersion: Ubuntu (64 bit)
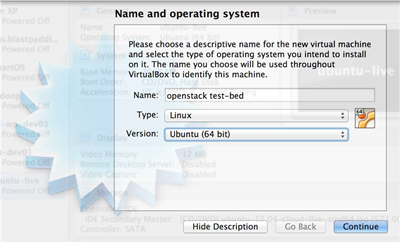
Once you have typed in the name and selected these settings from the pull down menus, click on the "Continue" button.
STEP FOUR: Resize your VM
Configure the virtual machine with 3 GB of RAM by either dragging the slider along until it reads 3072 MB, or click in the box and manually enter the value 3072, and click on the "Continue" button.
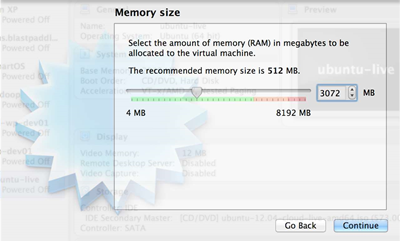
If you have more RAM, we recommend you allocate as much as you can spare, 4GB or more will perform better. The more RAM you can allocate the better, keeping in mind everything we are building here will run in memory and not on disk.
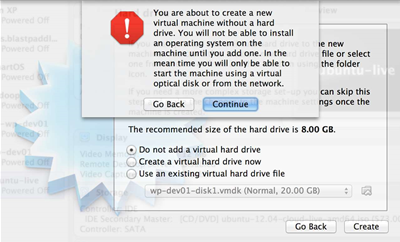
We do not require a hard drive image for this virtual machine - as we will be booting a live CDROM image. Select "Do not add a virtual hard drive" and click on the "Create" button.
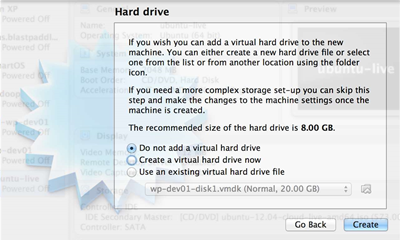
You will be prompted with a warning highlighting that you are about to create a virtual machine without a hard drive, simply click on the "Continue" button.
Read on to the next page...